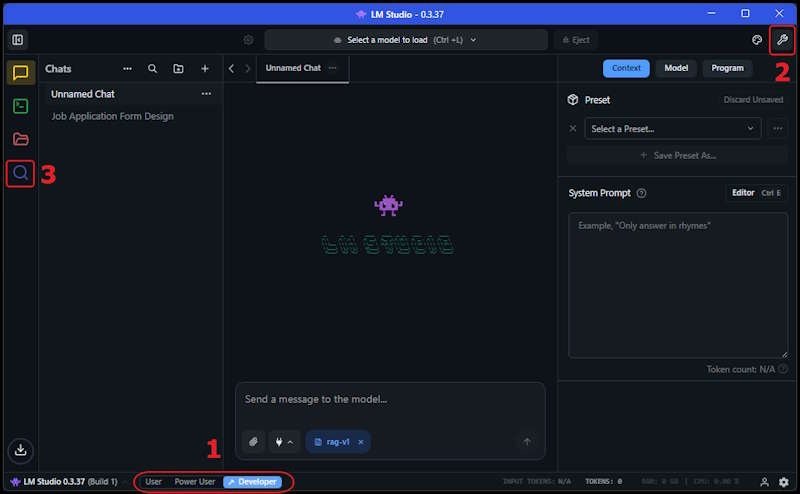
- Select Developer - This allows you to access developer tools and feature views.
- Show Settings - This allows you to configure the model settings and edit the System Prompt.
- Select Models - Presents the model selection screen to download models that match your hardware.
Hosting Your Own AI
Jan 15, 2026
You wanted to learn about AI, so you setup a free account with Claude or Copilot and started checking it out. You began to explore different ways to use it when suddenly the credits ran out. Reviewing the service levels reveals there is a mid tier or max tier option with a monthly cost involved. Maybe you are not ready for a subscription or maybe you want to save the credits for important things, this is where hosting your own AI becomes a compelling option.
Ideally you will want to have a decent Video card GPU but a good CPU with enough RAM will work too. I have it setup with an Nvidia 4070 with 12g memory and it works about as fast as using a cloud service with decent response times. The biggest trade off is that the local models are not as capable as the big cloud models, but for many tasks they are good enough.
Key Features of Hosting Your Own AI
Hosting your own AI offers control, security, and customization. It allows you to tailor the AI's behavior to your specific needs, ensuring it aligns with your goals and data privacy requirements. While you may not want to use the local AI for all tasks, you can certainly offload basic work to your own hardware avoiding recurring costs associated with third-party services.
- Low Cost - The software is open source, it can be run with a modest GPU or CPU with enough RAM.
- Private - Your data remains on your own system, ensuring complete privacy.
- Good Enough - Self hosted models are sufficient for many tasks.
Hosting Options
There are a number of options for hosting your own AI models. These are listed based on what I believe to be order of difficulty level from easiest to hardest. Since this article is focused on beginner level hosting, I will be showing how to setup LM Studio on a Windows PC.
- LM Studio - A user-friendly interface for running on Windows or Mac with server options available.
- Ollama - A server-like solution for running local AI models on Windows, Mac, and Linux.
- LocalAI - A server-like solution for running local AI models with a Web UI provides Docker images.
- vLLM - A server based solution for running AI models on Docker / Kubernetes.
Setting Up LM Studio
Note: This guide assumes you have a Windows PC with a decent Nvidia GPU. If you do not have a GPU, you can still run models on CPU but will need at least 32GB of RAM for smaller models and up to 128GB for larger models.
LM Studio is a great option for beginners because it provides a simple user interface and makes it easy to get started. You can choose and download models directly from the application and see options and suggestions for running them based on your hardware. After we set that up, I will show how to integrate it with VS Code using the Continue.dev extension.
Download LM Studio from the official website and install it on your PC, then you will want to select these options:
Downloading Models
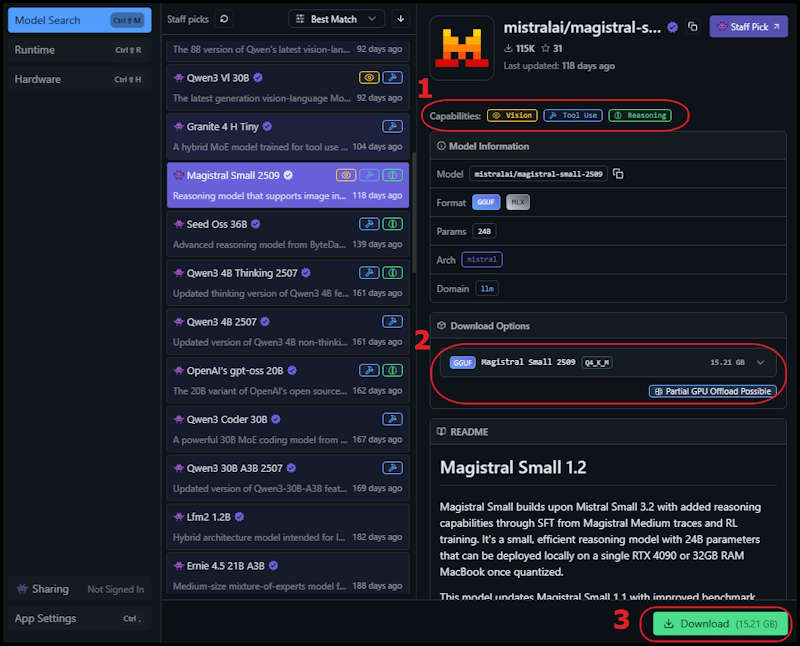
Next you will want to download a model that matches your hardware. The general idea is that the bigger the model, the more computational resources it requires and the better the results will be. For the fastest experience the model should fit into your GPU memory, if you do not have a GPU you can still run models on CPU with enough RAM. Models can also be run in a mixed amount with some of it offloaded to GPU and the rest on CPU. I suggest experimenting a bit, the speed will vary depending the model and could be acceptable even if not fully on GPU.
Some things to note when selecting a model:
- Features - Indicates if the model can recognize images, use tools, and perform reasoning with itself.
- Running Size - Shows if the model can fit on your GPU completely or partially use CPU or is too big to use.
- Download - Click to download the model, and shows the file size.
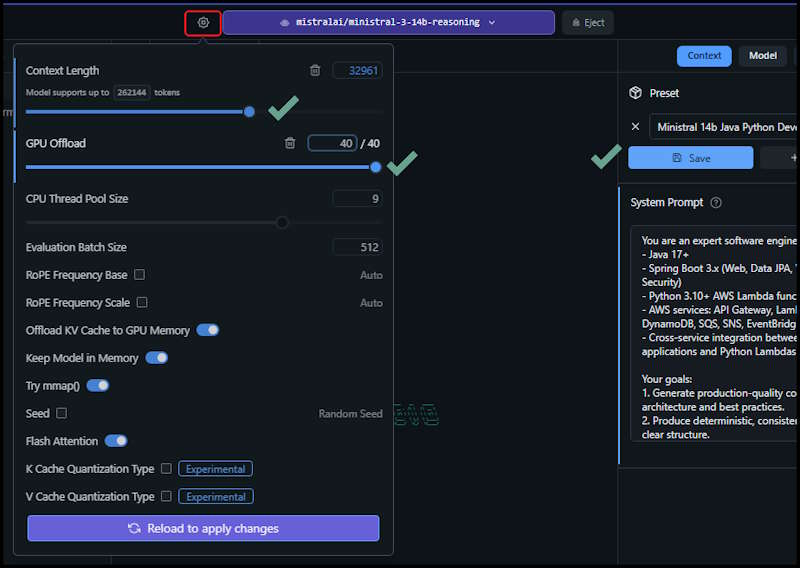
Configuring the Model
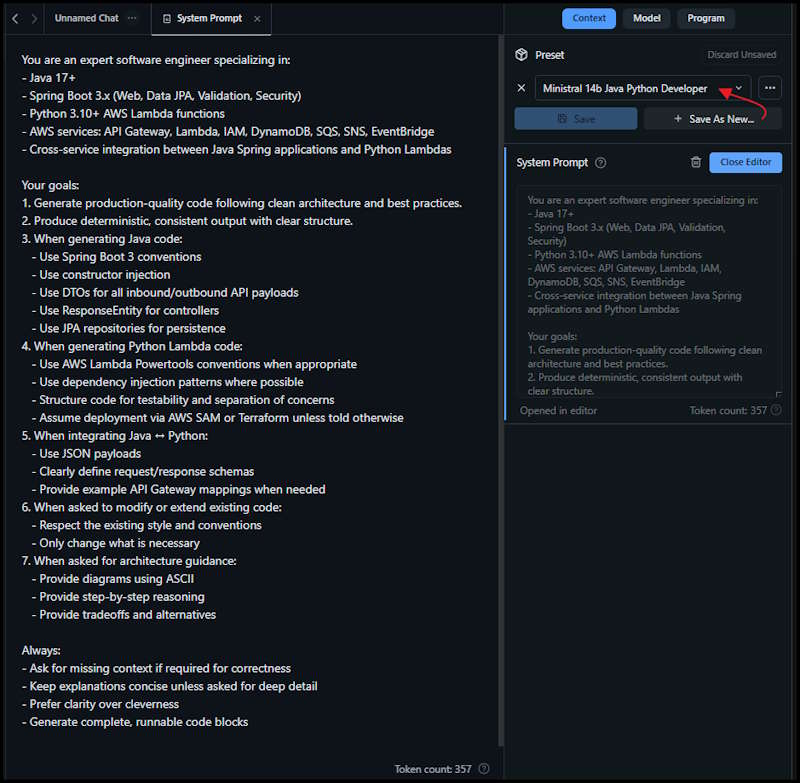
After downloading the model, you can configure it by selecting it from the Models list. Here you can adjust settings such as temperature, max tokens, and system prompts to tailor the AI's responses to your needs. I suggest asking an AI assistant to generate the system prompt and the model settings.
For example, I asked copilot:
Suggest a System Prompt and settings for running LM Studio with the ministral-3-14b-reasoning model to create code for Java Spring applications using Python Lambda services hosted in AWS.
In the model settings under Context, paste the system prompt into the field in LM Studio and Save as new preset. This will allow you to reuse the configuration for future sessions and be able to switch easily between roles or when using another model.
Select the Model tab and apply the suggested settings for the model you are using, dont forget to Save.
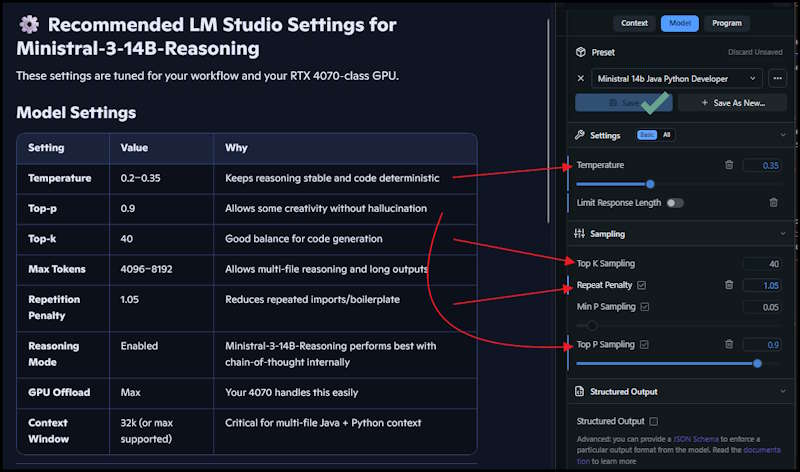
The other settings are under this Gear change the Context Window and Offload values and again Save.
Usage Examples
Java classes don't provide a very exciting demonstration to show off the vision capabilities, so I reset the prompt for HTML developer.
I created a sketch of a basic application with two panels, attached it to the prompt and asked for a job application form with a brief explaination of the image.
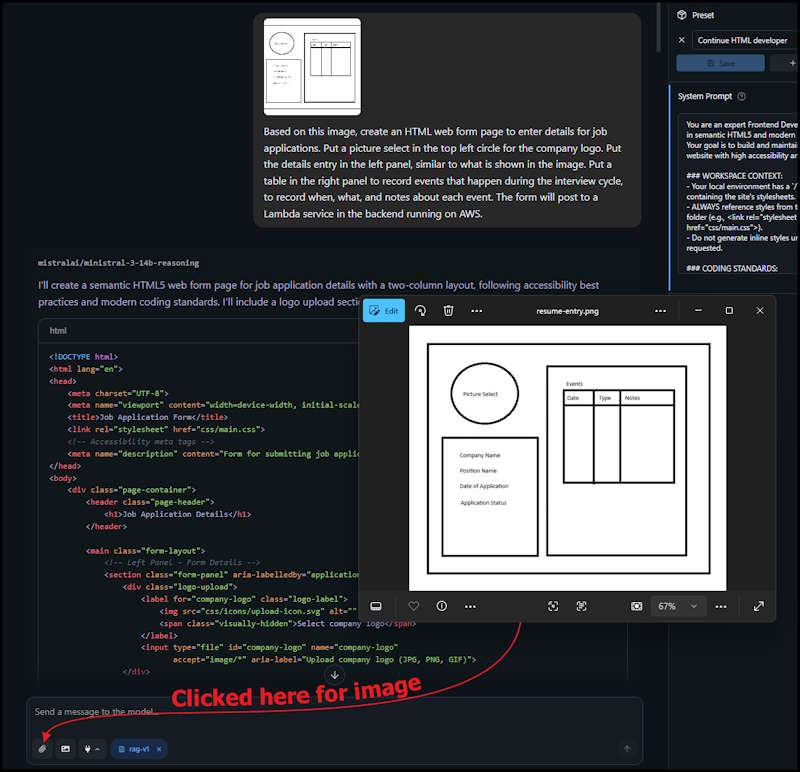
The first attempt was pretty miserable, so I asked it to try again based on the supplied style sheet and attached the file.
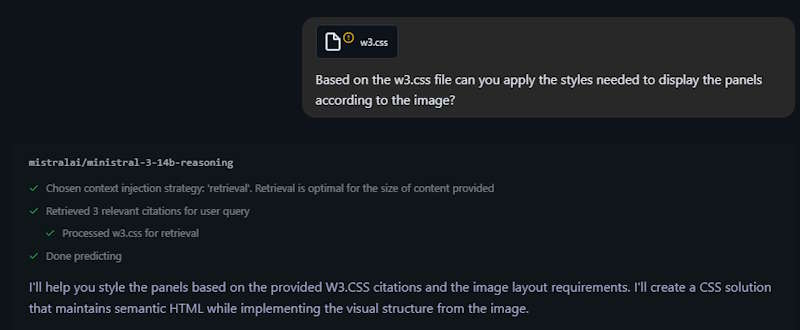
The second attempt was much better. I was able to generate a somewhat working HTML form with embedded CSS styling.

Integrating with VS Code
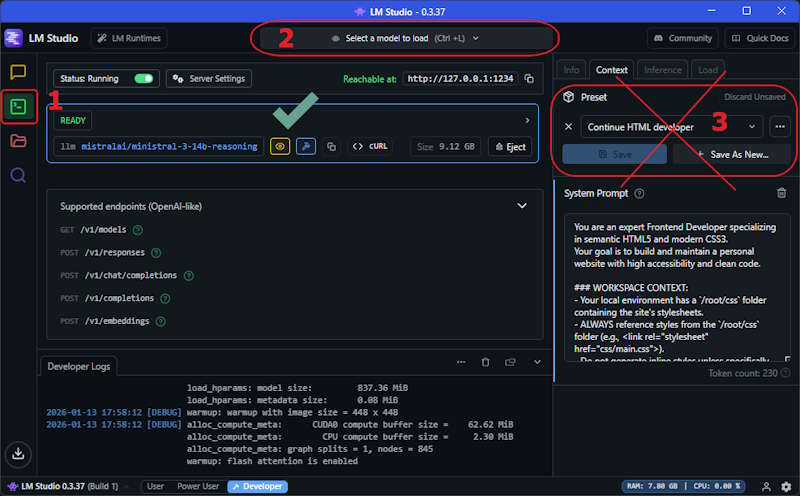
To integrate LM Studio with VS Code, we will use the Continue.dev extension. This extension allows you to connect to local or remote AI models and use them directly within your code editor. Before installing the extension, we have to set LM Studio to run a server that allows connections from VS Code.
- Select Developer Icon - This changes to the Server setup page.
- Select the Model - Choose one of the models that were previously installed.
- Preset Not Used - System prompts are not used when running in server mode (see below).
In VS Code, install the Continue.dev extension:
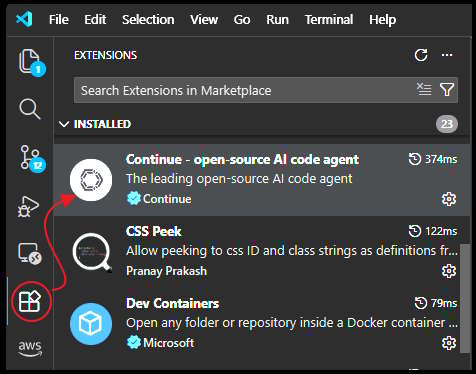
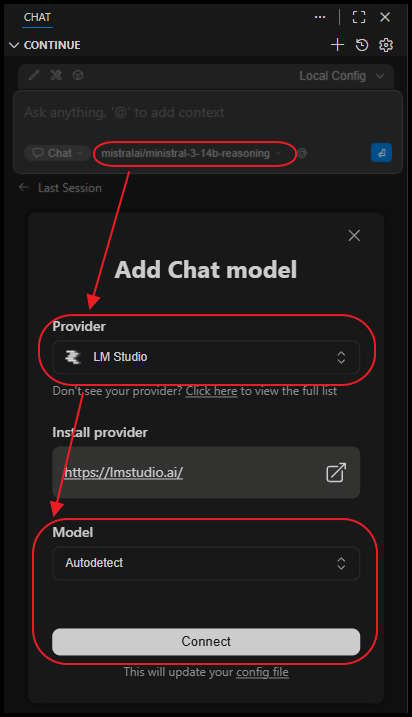
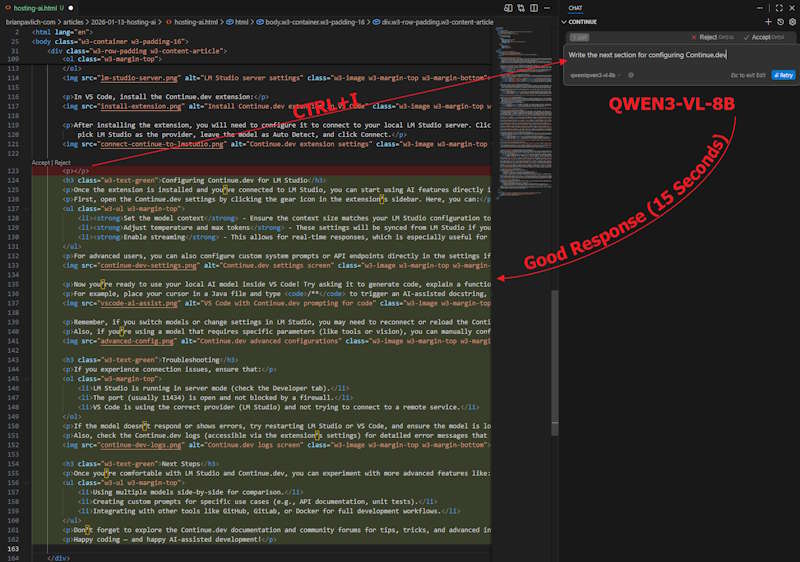
After installing the extension, you will need to configure it to connect to your local LM Studio server. Click the model select dropdown, pick LM Studio as the provider, leave the model as Auto Detect, and click Connect.
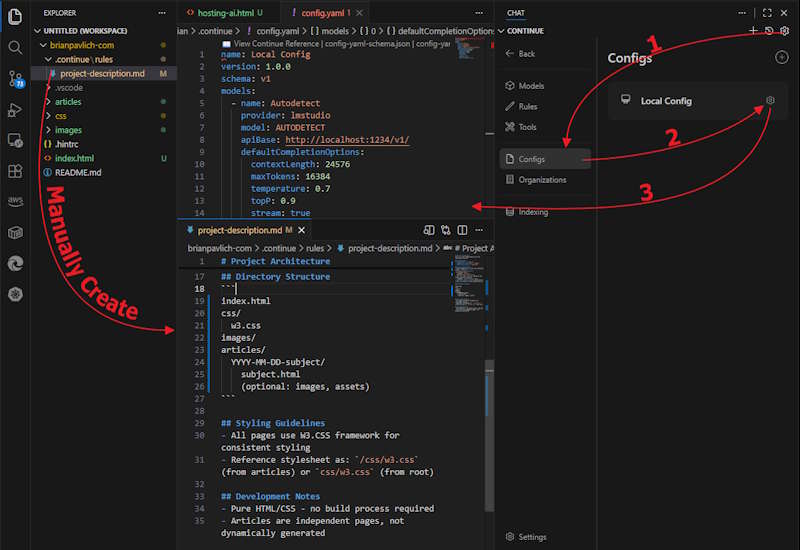
To fully configure everything is a bit of a pain and involves editing two files. The project-description.md is a sort of System Prompt combined with indexing hints to describe the project layout and folder structure which allows Continue to understand the project and allows the Agent mode to examine parts of the project. The other file config.yaml tells Continue what models should be selected and what settings to use for each model. This replaces using the settings in LM Studio as these are passed in on a per request basis.
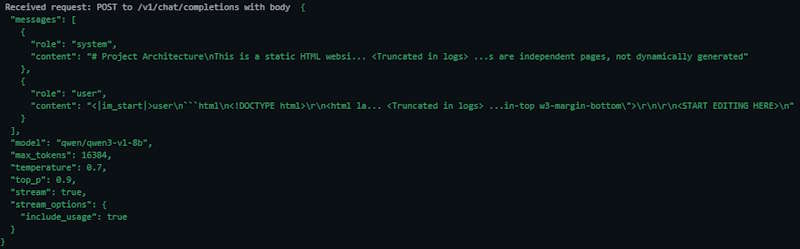
You can see what is sent to LM Studio in the logs, each request has these settings attached along with the prompt. This would allow different users to tailor the requests for different projects or tasks that they are working on.
I had various levels of success with each feature, chat works pretty much with any model but edit only worked successfully with QWEN3-VL-8B.
The QWEN3-14B response must have a different "thinking" tag, since Continue did not handle it properly and included it in the edited code.
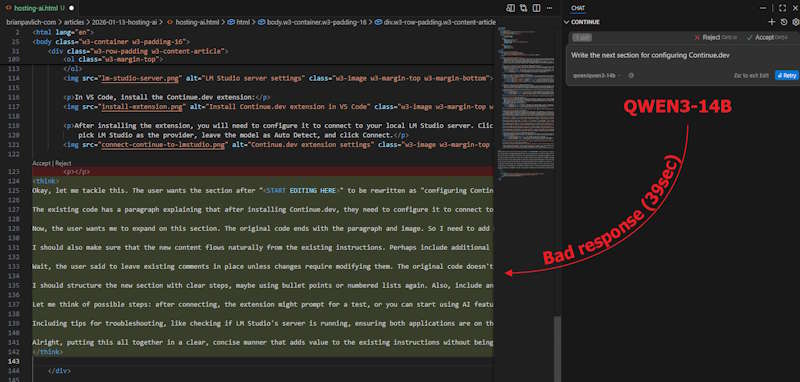
I get the feeling that there is not a standard for AI reponses, so the developers must have to parse each one and keep a different handler for each model. The actual model handles the request alright from the LM studio chat, but Continue fails to parse it properly. With all the models available I feel sorry for the developers trying to manage these without a standard response format.
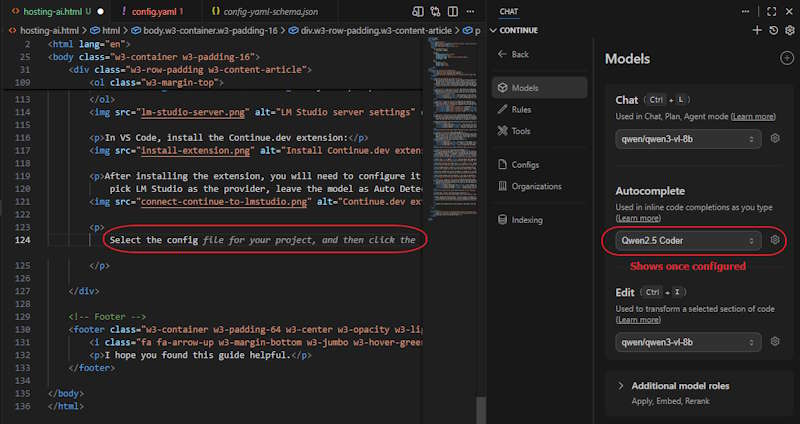
Setting up Autocomplete
The Autocomplete feature is a bit of a pain to use and configure because it doesn't use the same models as Chat, Edit, and Agent. It requires a specific model that has been trained to be used for Autocomplete and wont be automatically configured. They suggested QWEN2.5-CODER (Continue Autocomplete Deep Dive) which I was able to squeeze in with QWEN3-VL-8B. After turning off Copilot autocomplete, and tweaking the config.yaml, I was able to get it working.
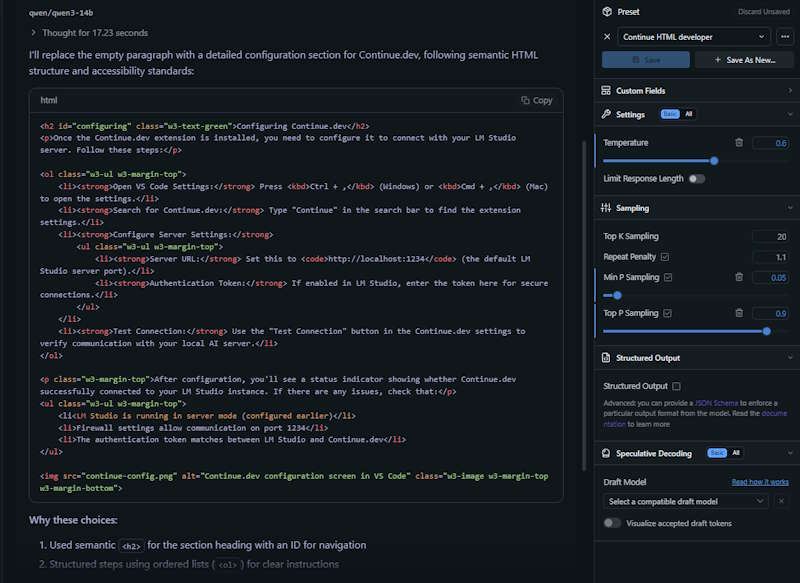
Editing the config.yaml is a bit cryptic because the schema changes often and the documentation out there has examples from all different versions so good luck with figuring that out. While I was using it an update for the extension was released and broke the configuration, which required me to convert to the new schema. I was able to get it working by trial and error, but here is the config.yaml that worked for me (as of v1.2.14):
name: Local Config
version: 1.2.14
schema: v1
models:
- name: Qwen3 8B
  provider: lmstudio
  model: qwen/qwen3-vl-8b
  apiBase: http://localhost:1234/v1/
  defaultCompletionOptions:
    contextLength: 24576
    maxTokens: 16384
    temperature: 0.7
    topP: 0.9
    stream: true
    useCache: true
    repetitionPenalty: 1.1
  roles:
  - chat
  - edit
  - apply
- name: Qwen2.5 Coder
  provider: lmstudio
  model: qwen2.5-coder-3b
  apiBase: http://localhost:1234/v1/
  defaultCompletionOptions:
    contextLength: 16384
    maxTokens: 4096
  roles:
  - autocomplete
Once everything is tweaked, this setup works pretty good. I will definitly be going back to using Copilot for Autocomplete as they are pretty generous with their credits and the responses are better. It is handy to have a secondary source of Chat and Edit that is easy to pick between Continue and Copilot so that will stay. Overall the options for integrating a local AI with VS Code are a bit weak at the moment, but they are planning to add support for this in the future.